


In the previous article, we learned some cases to note from the beginning of the injection molding process. So in this article, please follow the remaining steps to make sure there is a safe plastic injection molding process.
Notes when opening the mold during injection molding process
As the mold opens the volume increase without introducing air, which creates tremendous suction that holds the mold together. So at first the mold slowly opens several millimeters, it need time to allow air to rush in. That breaks the vacuum, then the mold quickly opens the rest, so the part can be removed. Because these injection molding machines with steel mold can cost hundreds of thousand dollars. Hence, the slow step is needed to prevent damage to the mold. Removing the part from the mold can be difficult. When the plastic cools, it shrinks and so become struck tightly on the core half of the mold. Molds have built-in ejector pins that push the part off the mold. The end of pins sit flush with the core half of the mold, but are not perfectly aligned.
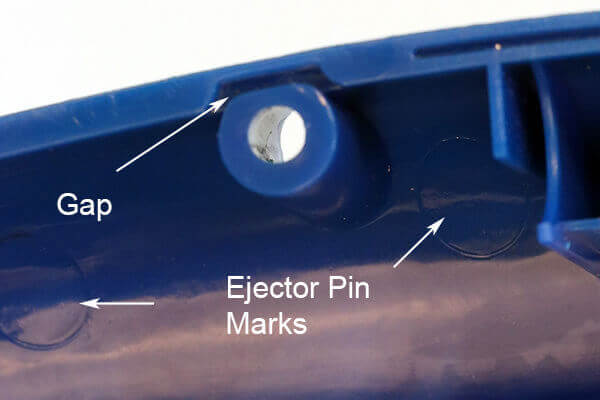
ejector pin “witness” marks on molded plastic products by injection molding process
Sometimes, they protrude or are indented slightly. So, if you look closely you will see circular ejector pin “witness” marks on molded products. For example, this chair, on it’s bottom, has array of witness marks. When the part drops from the mold, an operator has to remove the sprue. That section of plastic that connected the injection unit to the mold. Sprues are manually twisted or cut off the part. Sprues are attached to objects only in molds that make a single items at a time – like a chair.
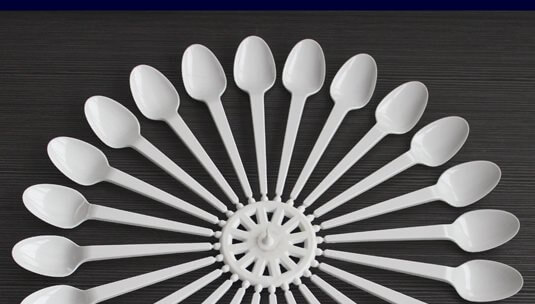
a network of distribution tunnels called “runners” in injection molding machine
Smaller objects are made in multiples in a single mold. In these the sprue connects not to the part itself, but to a network of distribution tunnels called “runners”. The runners fan out from the sprue and connect to each cavity in the mild via a small – typically rectangular – entrance called the gate. You can see the gate on plastic cutlery. The parts for model planes typically come still attached to their runners.
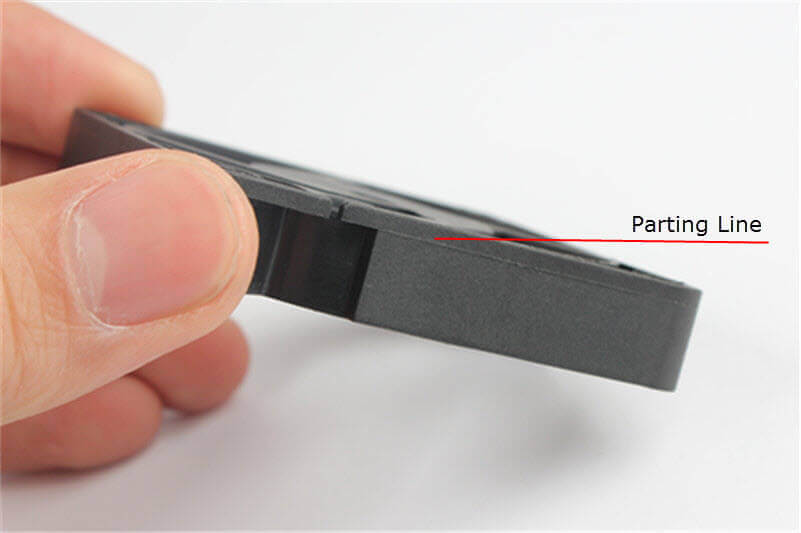
Parting line in injection molding
Molds always have at least two parts. And where the parts of the mold meet is called the “parting line”. Hence on this piece of cutlery you see the parting line along the side of the fork. When mold halves close they are never perfectly aligned, nor do they have sharp corners – this creates a noticeable parting line on the molded object.
Another very important aspect of mold design is the draft angle. If a part has walls that are exactly ninety degrees, it will be very difficult to eject because it’s inner walls will scrape the core half of the mold. Also, the vacuum will be difficult to break because air cannot readily enter. However, if the walls are tapered – one or two degrees, it becomes easier for the part to be removed. Because once the part moves slightly, the walls are no longer stick to the core half and air rushes in.
One impressive example of injection molding is the lego brick. You can see the injection point in the middle of a stud. But this is not a gate or a sprue. The lego molds use “hot runners”. Hot runners are a heated distribution network. This keeps plastic inside molten, while the plastic in the mold solidifies. This leaves no gates or sprues to be removed. The molded bricks are ejected ready to use.
The downside is that this setup is more expensive than a traditional cold runner system. On the bottom edges of the brick you can see ejector pin witness marks. And what’s most clever to me is where lego designs their draft angle. The outside of a lego brick must be square. So, if you cut a lego brick in half, you can see that these inner supports are thicker at the top than at the bottom – there is a draft angle of about one-and-a-half degrees. This helps the ejector pins push the brick off the mold. The core half and the cavity half of lego molds are designed. Hence, the purpose of this action is the parting line at the bottom edge of the brick. It will hide the parting line.
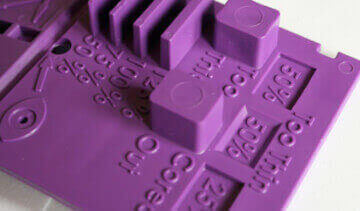
the date wheel or percentage of materials marks on plastic products
Look around and see how many objects people make by injection molding method you can find. Likely the device you’re watching this in has injection molded parts. You can find ejector pin witness marks and parting lines, but you might find something like this photo. It is a date wheel that shows the month year the item was made or percentage of materials used. These are removable inserts and can be changed out for each run of the mold. They are very useful for tracking down defects.
.